Hard Drive Recovery
- Format Hard Drive+
-
- How to Clone Hard Drive
- How to Format Hard Drive from Bios
- Format Hard Drive for Xbox One
- How to Format C Drive in Windows 10/7/XP
- How to Perform PS4 External Hard Drive Format
- How to Format Hard Drive from Bios
- Format Hard Drive for Xbox One
- How to Format C Drive in Windows 10/7/XP
- How to Perform PS4 External Hard Drive Format
- How to Format Drive in Linux
- How to Format Hard Drive to NTFS
- How to Format WD My Passport
- How to Format Your Drive to FAT32 System
- Format HDD Low Level
- Format a BitLocker Encrypted Drive
- How to Unformat Hard Disk
- How to Format a RAW Drive
- Fix Your Hard Drive’s Formatting Issues
- How to Format SSD
- How to Format your Hard Drive to exFAT File System
- How to Format a Hard Drive to FAT32
- Hard Drive Recovery+
-
- Top 10 Hard Drive Recovery Tools
- How to Recover Lost Data from Maxtor External Hard Drive
- How to Recover Data from Hitachi External Hard Drive
- How to Recover Data from Dead Hard Drive
- How to Recover Data from SimpleTech External Hard Drive
- How to Recover A Formatted Hard Drive in 3 Simple Clicks
- How to Recover Lost Data from Iomega External Hard Drive
- How to Recover Data from Toshiba External Hard Drive
- How to Recover Data from Transcend External Hard Drive
- Lacie External Hard Drive Data Recovery and Repair
- Best Way to Recover Data from a Floppy Disk
- How to Recover Data from HP External Hard Drive
- Best Method to Recover Data from Crashed Hard Drive
- How to Repair Toshiba Hard Disk
- Recover Files from WD My Book External Hard Drive
- Ways to Repair Seagate Hard Disk
- Fix Hard Drive Error+
- Hard Drive Tips+
- Mac Hard Drive Recovery+
-
- Recover Lost Data from Seagate External Hard Drive on Mac
- How to Recover Data from Formatted Hard Disk Drive on Mac
- How to Recover Data from Seagate Backup
- How to Recover Lost Data from Western Digital External Hard Drive
- Top 5 Tools for Mac Disk Recovery on Mac
- How to Format Toshiba Hard Drive for Mac
- Format a Hard Drive for Mac: Ultimate Guide 2021

• Filed to: Hard Drive Recovery • Proven solutions
There are several reasons to format a hard drive to FAT32 in Windows 10. For instance, you want to make your drive faster when writing large files to it or make the drive works with non-Windows operating systems. No matter what's your reason to format your hard drive to FAT32, you've landed in the right place.
Here is everything you should know about Windows 10 format disk FAT32. So, let's start to learn how to format the drive to FAT32 format and what to do if you lost your important files after the drive formatting.
Part 1: What is FAT32 Format?
When you get a new hard drive or while reinstalling Windows, the operating system may request you to format the drive. If the choice is given, you get three file systems to choose from - NTFS, exFAT, and FAT32. As the Format dialog doesn't explain what they are, so we will.
A FAT32 file system: It is the oldest of the three ones available for Windows. It is the most common version available of the FAT (File Allocation Table) file system. With the release of Windows 95, this file system was introduced as a replacement for the older FAT16 format used in Windows 3 and MS-DOS.
The big advantage of the FAT32 file system is that it's very old. It has been the standard format for hard drives and floppy disks so to maximize compatibility across modern systems including Mac, Linux, and Windows. The maximum size of the file you can store in the hard drive with FAT32 is 4 GB along with an 8TB maximum partition size.
You should use FAT32 on the drives where there is a requirement for maximum compatibility with a wide range of devices, and you don't have any 4 GB or larger file in size.
Part 2: Does FAT32 Work on Windows 10?
Even though the FAT32 format is so versatile and widely used, Windows 10 doesn't allow its users to format the hard drive in FAT32. There is a reason behind it. As it is an extremely old file system and that's why it has two significant limitations:
- The FAT32 file architecture can't be used on the hard drive larger than 16 TB.
- The FAT32 file system can't deal with the files which are bigger than 4 GB.
Both are huge issues for most people. That's why FAT32 got its replacement, which is the more modern file system known as exFAT (extended file allocation). The exFAT is better in terms of file-size limit. The only drawback of the exFAT is that it was introduced by Microsoft and that's why owns all the patents. It also means that manipulating this file structure, for instance, write, read and repair operations require a license.
Therefore, there are compatible issues while using exFAT. As a result, it makes the FAT32 file system easy to work with, regardless of the file-size limitations.
Part 3: Format Hard Drive to FAT32 on Windows 10 with Command Prompt/Powershell.
When it comes to formatting the drive to exFAT or NTFS file system, you can do with the usual or in-built Windows 10 formatting tool known as Disk Management. But, you can't use the formatting tool if you would like to format FAT32 Windows 10.
However, it doesn't mean there is no way to get the job done. While you can't select the FAT32 file system in the regular Windows 10 formatting tool, you can yet do it without any third-party software.
As formatting means deletion of everything and that's why it is recommended to create a backup of your important files before you proceed further.
So, let's now learn how to format a hard drive to FAT32.
Method 1: Using Command Prompt
Command Prompt is Windows Command Processor and it is used to perform commands in the Windows system. If you are good at working with commands, then you can try to format your hard drive to FAT32 using the command prompt.
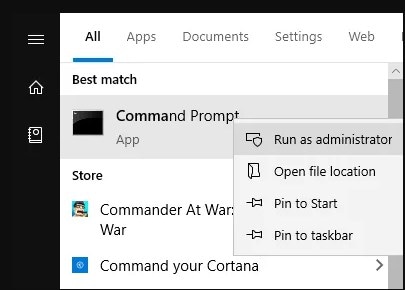
Step 1 In the Windows Search, look for the Command Prompt. Once finding it, right-click it and choose "Run as administrator" option.
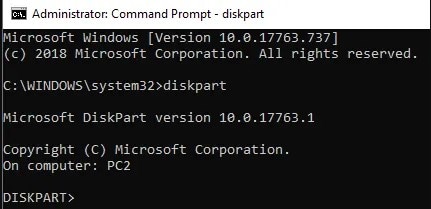
Step 2 Next, type "diskpart">" hit Enter.
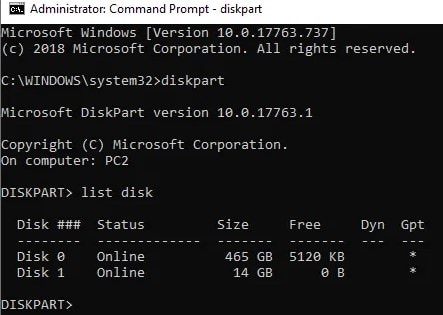
Step 3 After that, type "list disk">" hit Enter". Type "select disk*", where "*" is the drive number.
Step 4 Now, you need to type the following commands and press the "Enter" key after each command.
- create partition primary
- select partition 1
- active
- format fs=fat32
- assign
- exit
In a while, your hard drive will be formatted to the file system - FAT32.
Method 2: Using PowerShell
To format HHD to FAT32 Windows 10, you can use PowerShell if you don't want to use the command prompt. It is a task automation & configuration management framework developed by Microsoft, compromising of a command-line shell and related scripting language. You're probably familiar with this tool if you've been a user of a Windows 10 system for quite some time.
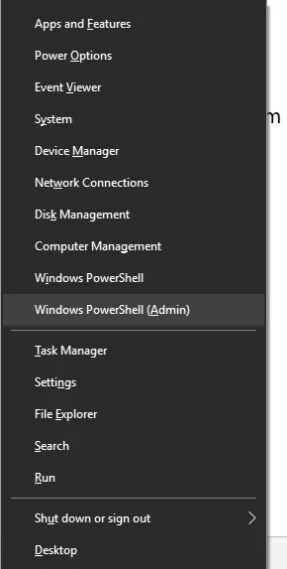
Step 1 To start the process, press the "Windows + X" keys at the same time to open a menu and click the "Windows PowerShell (Admin)" option.
Step 2 Next, you need to type the command - "format /FS:FAT32 D:" and press "Enter". Here, you need to replace the "D" with your drive letter.
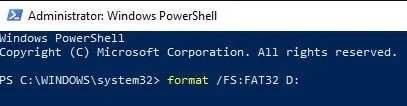
In a while, it will format your hard drive to FAT32. If you want to format FAT32 in Windows 7, then you can do that using PowerShell as well as the command prompt.
Attention: Windows 10 fat32 format will make all your data existed in the hardd rive lose, please backup your important data before formatting the hard drive to FAT32 to avoid data loss.
Part 4: How to Recover Data from Formatted FAT32 Drive?
There are times when you end up losing your important data after performing drive formatting to FAT32. In such cases, a backup comes quite in hand to restore the lost files with ease.
But, what if there is no backup and you want to recover the files stored in the formatted FAT32 drive? In such scenarios, all you need is the best data recovery software like iSkysoft to help you rescue your data.
With the assistance of Recoverit (IS) software, you can get back your lost data in no time. It can help you recover any type of file from your formatted drive. In short, it can recover everything from external drives and computers. It has a simple interface, which makes the data recovery easy even for a non-tech savvy person.
Recoverit (IS)
Why You Should Choose Recoverit to Recover Data from FAT32 Drive
- Supports file types including photos, videos, audios, documents, graphics, emails, etc. to recover.
- Using iSkysoft, you can recover data from various storage devices including external hard drive, internal hard drive, memory card, pen drive, etc.
- It is compatible with Windows as well as Mac system.
- Whether you lost your files due to device formatting, accidental deletion, virus attack, system crash, etc, every data loss situation is covered.
- User friendly: Three simple and easy steps to recover files.
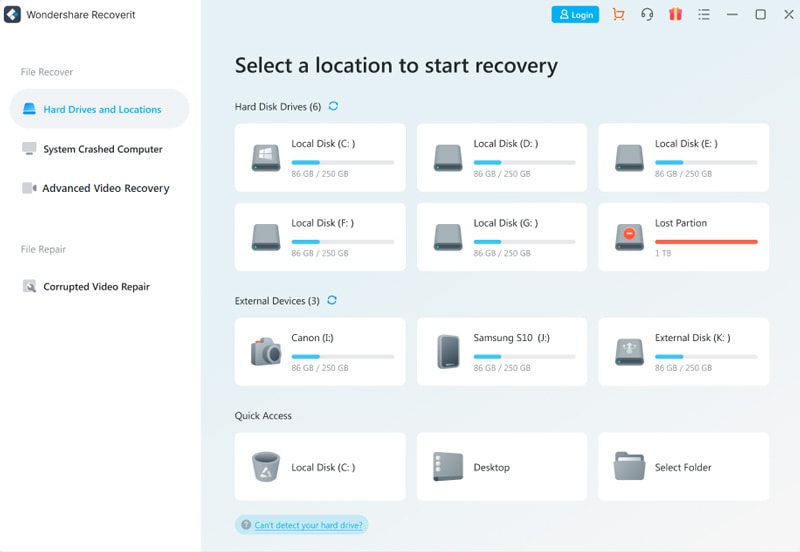
Step 1 Select a location
Install and run Recoverit (IS). Then, select the drive from where you lost the files and click the "Start" button to continue with the process.
Step 2 Scan the location
Once hitting the Start button, the software will start the scan process to look for the lost files in your selected drive or location. Here, you can choose filers or define selections, for instance, choose to scan a specific file path or type.
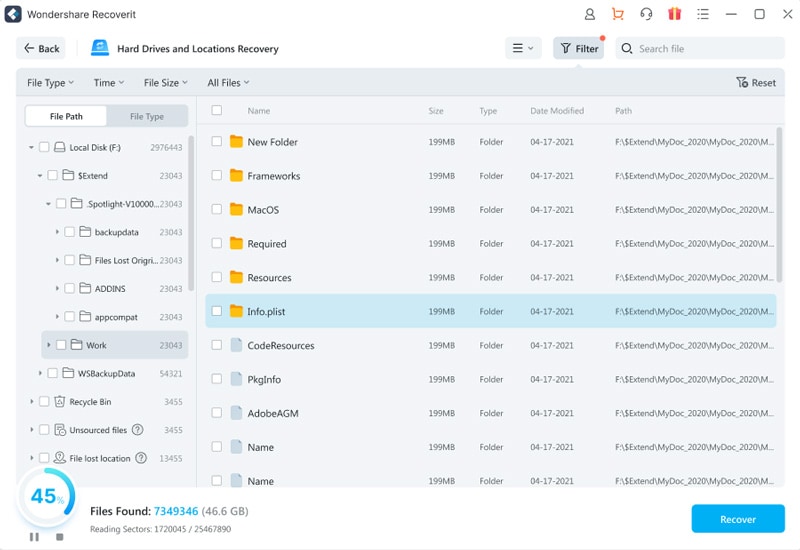
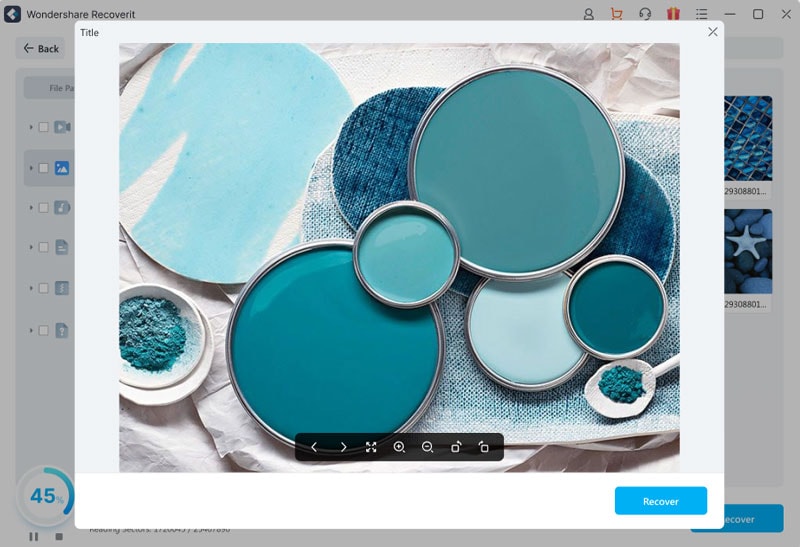
Step 3 Preview & recover data
Once the scan process finishes, preview the recoverable files. Select the target ones you would like to recover and hit on "Recover" button to get the selected files back on your system.
Keeping the recoverable data to the location from where you lost them before is not recommended. Instead, choose another safe location.
Conclusion:
That's how to format HHD to FAT32 on Windows 10 PC. Using the methods mentioned here can help you in formatting your hard drive to the FAT32 file system on your Windows system.
In case if there is data loss after formatting the drive, using Recoverit (IS) as soon as possible is strongly ecommended recovering your lost files. Otherwise, you could lose your important files forever.
Elva
staff Editor