Backup iPhone
- iPhone Backup Solutions+
-
- Backup iPhone to iCloud
- Backup iPhone to External Hard Drive
- Backup Jailbroken iPhone
- Backup iPhone to Computer
- Backup iPhone to Dropbox
- Backup iPhone iPad
- iPad Backup Software
- Top iPhone Backup Software
- Backup Jailbroken iPhone
- Backup iPhone Without Computer
- Backup iPhone to iTunes
- iPhone SMS Backup Apps
- Backup iPad without iTunes
- Backup Locked iPhone
- Backup iPad to Computer
- Backup iPhone Without Passcode
- Backup iPhone 6s
- iPhone Backup Data+
-
- Backup iPhone Contacts
- Extract Contacts from iPhone Backup Files
- Backup iPhone Contacts to Google Account
- Backup iPhone Notes
- Backup iPhone Music
- Backup iPhone SMS to Gmail
- Backup iPhone WhatsApp
- Backup Messages on iPhone
- Backup iPhone Photos
- Backup iPhone Calendar
- iPhone Google Cloud Print
- Backup iPad Bookmarks
- Contacts from Phone to Computer
- Restore iPhone Backup+
- iPhone Backup Tips+
-
- Delete iPhone Backup
- Undo iPhone Backup
- iPad Won't Backup
- iPubsoft iPhone Backup Extractor
- Delete iPhone Backup on Mac
- Backup iPhone Contacts Without iTunes
- iTunes Backup Location
- iTunes Backup Password
- iMessage for Windows
- Export iPhone Calendar
- Print Contacts from iPhone
- Save iPhone Messages
- Print Messages from iPhone
- Upgrade Jailbroken iPhone
- Export Emails from iPhone
- Hide Messages on iPhone
- iPhone Print
- iPhone Voicemail not Working
- 3 Methods for Backing up iPad without iTunes

• Filed to: Backup iPhone • Proven solutions
If you own an iPhone XS and don’t like to lose your important data, then you must know how to take iPhone XS data backup. Ideally, there are different to backup iPhone XS. You can take its backup on a local computer, iCloud, and even via iTunes. A lot of users complain of losing their data out of the blue and never getting it back. If you don’t want to face the same situation, then why not backup iPhone XS to iCloud, iTunes, or your computer. In this post, I will explain all the three possible techniques in detail.
Part 1: How to backup iPhone XS to iCloud?
One of the easiest ways to perform an iPhone XS data backup is by saving your phone’s content in the cloud. In this way, you can access your data across multiple platforms and would never have to worry about losing it. You might already know that by default every iOS user gets a free space of 5 GB in the cloud. Most of the times, it is not enough to backup iPhone XS to iCloud completely. Therefore, if you want to save all your data in iCloud, then you might consider getting more space.
If you are sure that there is enough free space on your iCloud account, then follow these steps to backup iPhone XS to iCloud.
1. To start with, unlock your phone and go to its Settings. Tap on your Apple ID > iCloud.
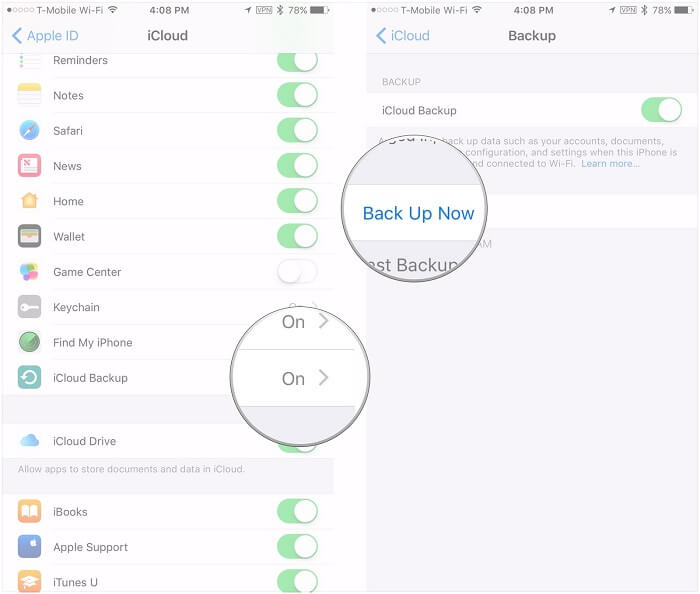
2. Now, go to the iCloud Backup feature from all the provided options and turn it on. This will enable the automatic sync of your phone’s data with iCloud.
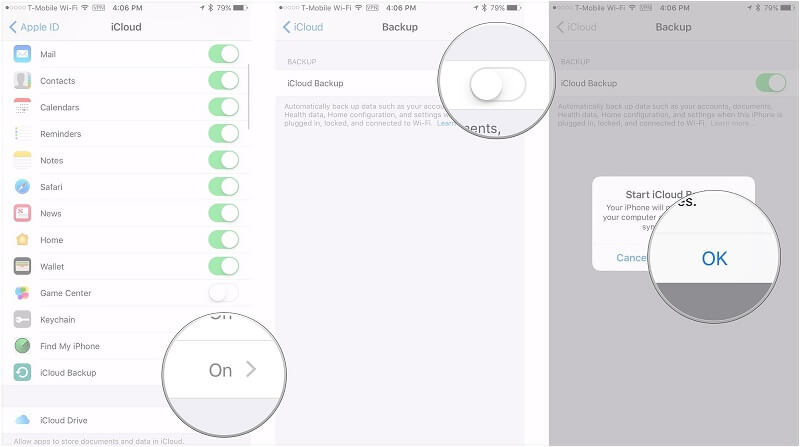
3. To take an immediate backup of your data, tap on the “Backup Now” button here.
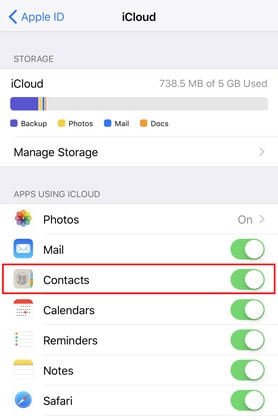
4. From the iCloud settings you can further customize the kind of data that would be synced. For instance, you can turn on/off sync for contacts, bookmarks, notes, and more. If you want to backup your contacts, simply turn on the “Contacts” option from here.
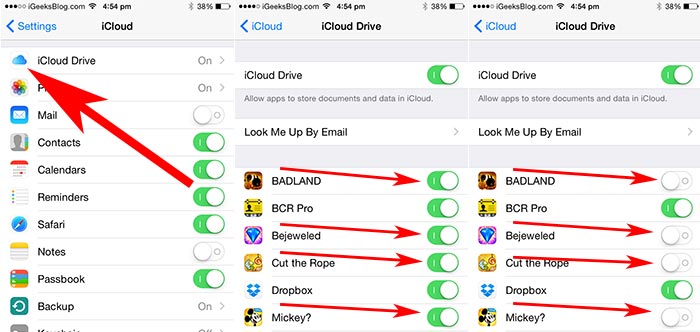
5. In the same way, you can backup apps on iCloud as well. Just go to the iCloud Drive settings and turn on the backup option for any app of your choice.
6. You can also save your photos on iCloud as well. To do this, go to the “Photos” tab in iCloud settings. From here, you need to turn on the iCloud Photo Library option. Furthermore, you can turn on Photo Stream and customize the way photos are saved on iCloud.

7. Since iPhone XS runs on iOS 12, you can also use the Messages on iCloud service as well. Just go to your device’s iCloud settings and enable the Messages sync option. This will sync your messages (text and iMessages) across multiple devices.

8. In this way, you can easily backup iPhone XS to iCloud. To restore an iCloud backup, you need to perform its initial setup. If you are already using the device, then you need to factory reset it beforehand.
9. While setting up your device, choose to restore an iCloud backup. To continue, you need to log-in to your iCloud account.
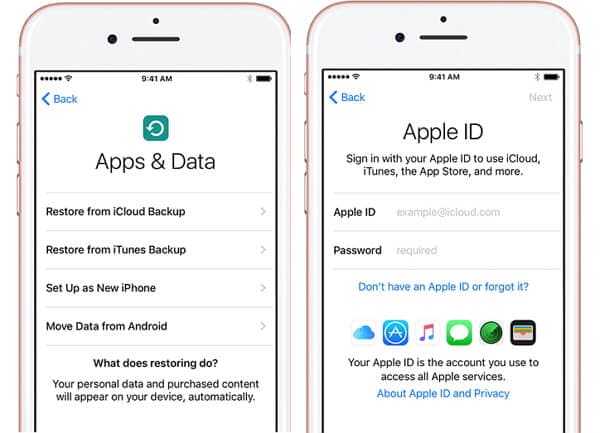
10. Select the backup that you wish to restore and wait for a while as its content would be loaded on your device.

By performing this stepwise drill, you can backup iPhone XS to iCloud and restore it afterward as well. Though, you should know that you can’t selectively restore your data. Also, if you are solely relying on iCloud, then you would have to buy more space for your account.
Part 2: How to backup iPhone XS using iTunes?
Besides iCloud, a lot of people also like to backup iPhone XS to iTunes. Similar to iCloud, iTunes is also a freely available native service offered by Apple. Though, unlike iCloud’s 5 GB free storage, there are no such restrictions with iTunes. The only problem you might face is that you can’t selectively backup and restore your data. Furthermore, when we restore an iTunes backup, all the existing data on our phone is erased.
Even though iTunes has a major drawback, it is recommended to backup iPhone XS to iTunes to overcome an unwanted data loss. Here’s how you can do it.
1. Launch an updated version of iTunes on your Mac or Windows PC. If you haven’t used iTunes in a while, then visit its Menu and check for updates.
2. Using an authentic cable, connect your iTunes to the system and let iTunes detect it automatically.
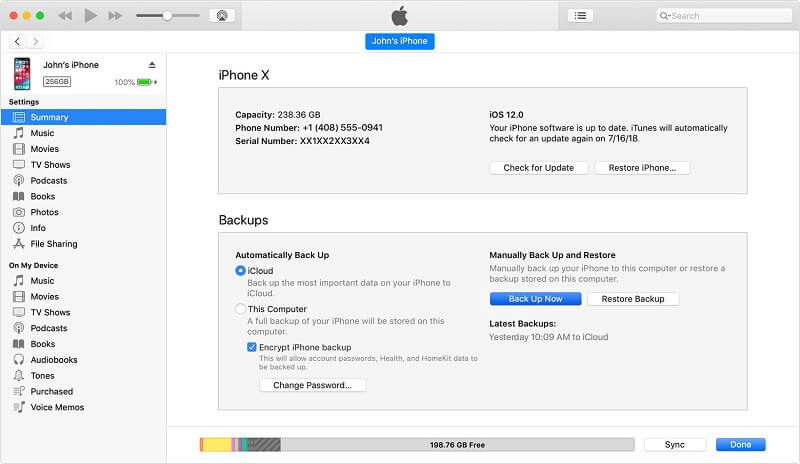
3. Select your iPhone XS from the list of the connected devices and go to its Summary tab.
4. Click on the “Backup Now” button, under the “Backups” section. Just make sure that you are taking the backup on “This Computer” instead of iCloud.
5. Wait for a while as your system would automatically backup iPhone XS to iTunes. Once it is completed, you can disconnect the device.
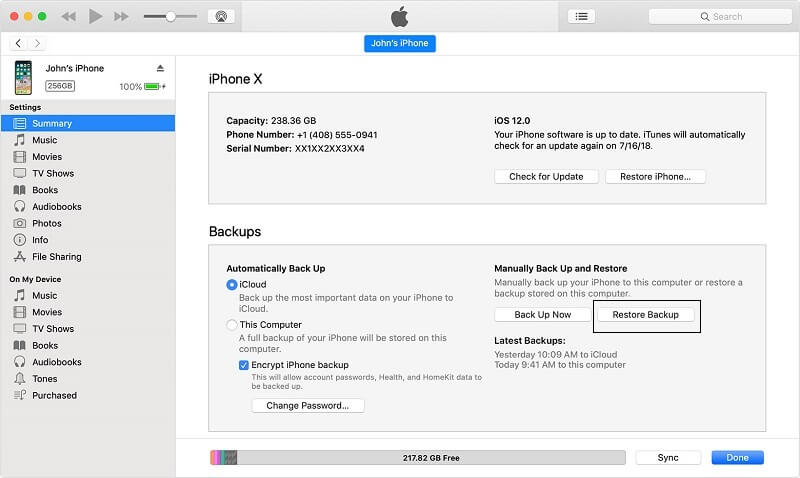
6. Whenever you wish to restore the backup, connect your device to the system again and launch iTunes. Choose the connected device and visit its Summary.
7. Instead of the taking a backup, click on the “Restore Backup” button.
8. From the following pop-up, you can simply select the backup file of your choice and click on the “Restore” button to start the process.
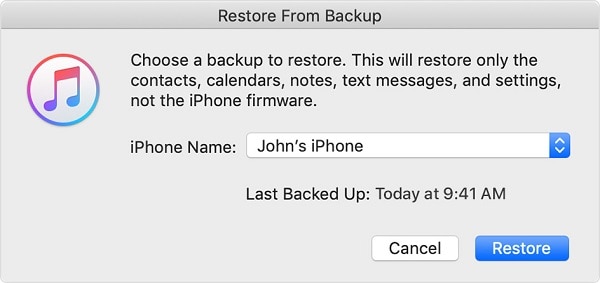
In no time, the data from the backup file would be restored to your device. Needless to say, it will erase all the existing content on your iPhone XS.
Part 3: How to backup iPhone XS to computer selectively?
As you can see, it can be tough to perform iPhone XS data backup with iCloud or iTunes. Therefore, if you are looking for a simple, reliable, and fast solution, then consider trying dr.fone - Phone Backup (iOS). A part of the dr.fone, it will let you select the type of data that you wish to save. Also, users can get a preview of the backup and selectively restore it to their device. Unlike iCloud or iTunes backup, it won’t erase the existing data on your iPhone XS.
The tool is extremely easy to use and does not require any prior technical experience as well. You can backup your contacts, photos, messages, notes, app data, bookmarks, documents, and more with a single click. It is available for both, Mac and Windows versions that can simply be downloaded from its official website. Also, it is compatible with every leading iOS device like iPhone XS, XR, X, etc. Here’s how you can use it to backup iPhone XS to computer.
1. Launch the dr.fone on your system and select the “Phone Backup” option from its welcome screen. Also, using an authentic cable, connect your iPhone to the system.

2. Once the device is detected, click on the “Backup” button.
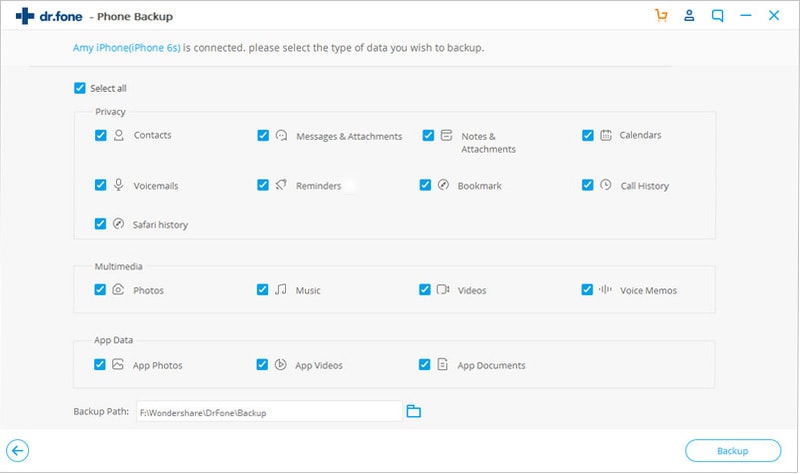
3. After making the appropriate selections, you will get the following interface. Now, you need to select the type of data that you wish to backup. If you want, you can select all categories at once as well.
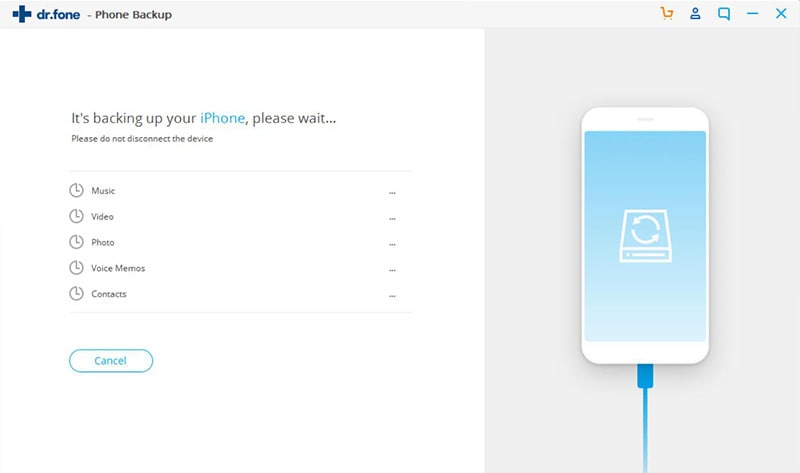
4. Then click "backup" to backup iPhone XS to computer. You can view the progress of the operation from an on-screen indicator. Just make sure that you don’t disconnect your device in between.
5. When the iPhone XS data backup is completed, you will be notified. You can safely remove your device now.
6. Whenever you wish to restore the previously taken backup, launch the application and connect your phone to the system again.
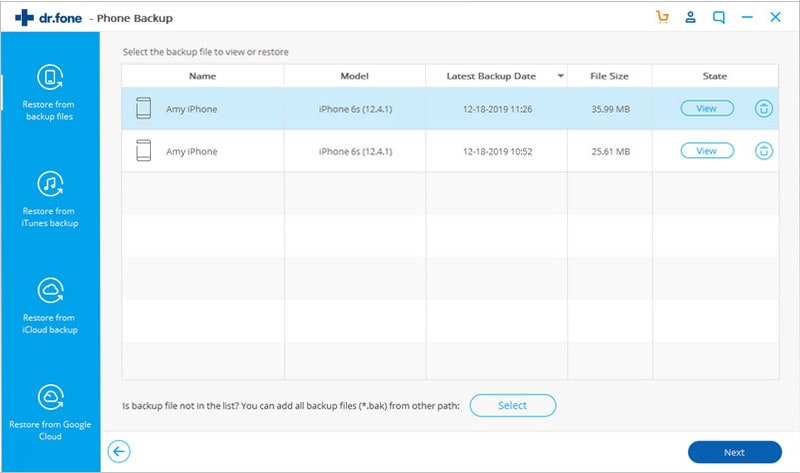
7. From its main screen, choose to restore the existing backup files.
8. The interface will display all the previously taken backup files that are saved on the system. Simply select the file of your choice to proceed.
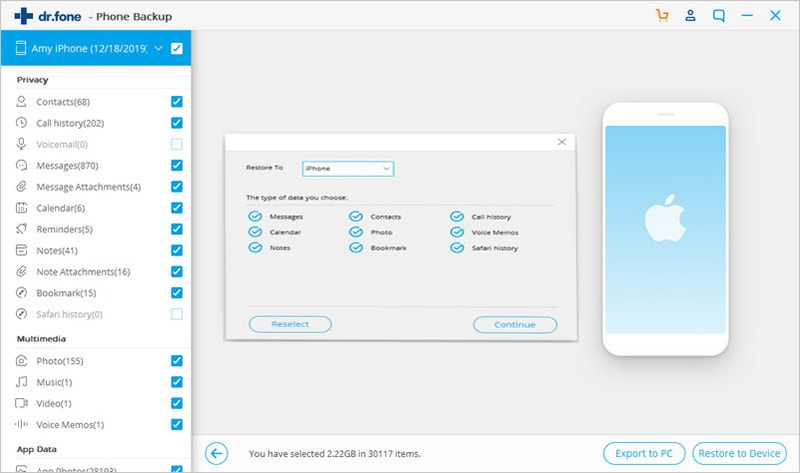
9. This will load the data from the backup file and segregate it into different categories. You can simply visit any category and preview its data.
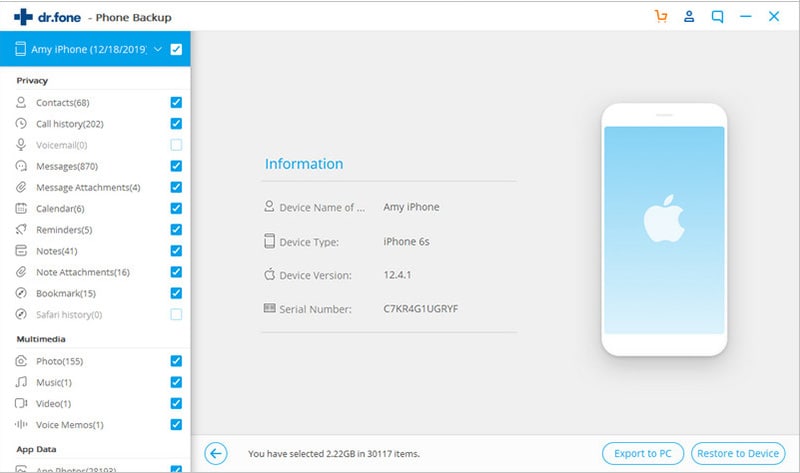
10. Select the content that you wish to retrieve and restore it back to your phone or the system.
That’s it! With dr.fone – Phone Backup (iOS), you can easily backup iPhone XS to computer. Additionally, you can also restore content from a backup file to your phone without any data loss as well.
Which solution should I opt?
After getting to know about the three best solutions to do iPhone XS data backup, you might be a bit confused. To help you pick an ideal option, I have quickly compared all the above-mentioned solutions at a glance.
| iCloud Data Backup | iTunes Data Backup | dr.fone – Phone Backup (iOS) |
|---|---|---|
| The backup will be stored in the cloud | You can store the backup on iCloud or the local computer | The backup will be saved on the local computer |
| Users can partially select what they wish to backup | Users can’t select the type of data they wish to backup | Users can pick the type of data they want to save |
| A bit confusing | Complicated solution | Extremely user-friendly |
| Existing data on the device would be deleted while restoring the backup | Existing data on the device would be deleted while restoring the backup | The existing data on your device won’t be lost when you restore your backup |
| No preview of backup is provided | No preview of backup is provided | Get a categorized preview of the backup content |
| Can backup only major data types | Can backup only major data types | Extensive data backup option (including third-party app data) |
| No compatibility issues | A few compatibility issues | No compatibility issues |
| Only 5 GB of space is free (users need to buy more space afterward) | Freely available solution | Only trial version is available for free |
I’m sure that after reading this guide, you would certainly be able to take iPhone XS data backup without any hassle. As you can see, dr.fone – Backup & Restore (iOS) provides a user-friendly and reliable solution to directly backup iPhone XS to computer. You won’t face any complication while restoring the backup back to your phone as well and can selectively backup/restore your data. Feel free to give it a try and never lose your important files again!
Elva
staff Editor